FastAPI – How to Build a Simple REST API in Python? – Part 3

Hey, today we invite you to the final part of the articles on Python API, where we will add tests to our project written in PyTest along with a database running in memory and a new version of the Dockerfile capable of running these tests. If you’re curious, we invite you to read on.
Tests
To add tests to our project, we will start by configuring the mongomock database running in memory. We do this in order to test our code with a real database connection underneath without initializing a separate instance or container. We will create the database programmatically using the mongomock library. To achieve this, in the tests folder, we will create a module called conftest, containing files init.py and conftest.py.
conftest.py:
from pymongo.database import Database
from typing import Any, Callable
from pymongo.collection import Collection
import pytest
from fastapi.testclient import TestClient
from mongomock import MongoClient as MockMongoClient
import os
from app.app import app

client = TestClient(app)
API_AUTHENTICATION_PREFIX:str = os.getenv('API_AUTHENTICATION_PREFIX','/api')

@pytest.fixture()
def inmemory_database_creation_function() -> Callable[[], Database[Any]]:
    def db_creation() -> Database[Any]:
        client = MockMongoClient()
        db: Database[Any] = client['shop']
        collection: Collection[Any] = db['users']
        collection.insert_one({'email': 'aaa@aaa.com',    "role":"user", 'password_hash': '9c520caf74cff9b9a891be3694b20b3586ceb17f2891ceb1d098709c1e0969a3'})
        collection.insert_one({'email': 'bbb@bbb.com',    "role":"user", 'password_hash': '77cd27bc3de668c18ed6be5f5c2909ffdacdf67705c30d132003ad5a89085deb'})
        return db
    return db_creation
Now let’s write two example tests for our endpoints /api/register and /api/login. We will create a file named test_auth.py in the tests folder, and in it, we will add the following two tests:
from httpx import Response
from fastapi import status
from app import app
from pymongo.database import Database
from typing import Any, Callable
import os
from app.database.connector import Connector
from tests.conftest.conftest import client, app, inmemory_database_creation_function, API_AUTHENTICATION_PREFIX

envs: dict[str, str] = {
    'JWT_ACCESS_TOKEN_SECRET_KEY': 'accesstokenkey',
    'JWT_ACCESS_TOKEN_EXPIRE_MINUTES': '10080',
    'JWT_TOKEN_ALG': 'HS256',
}

def test_given_existing_account_when_logging_in_then_response_parameters_are_ok(
    inmemory_database_creation_function: Callable[[], Database[Any]],
    monkeypatch
) -> None:
    # Update ENV variables
    monkeypatch.setattr(os, 'environ', envs)
    # Mock DB
    app.dependency_overrides[Connector.get_db] = inmemory_database_creation_function

    # Given
    user_data: dict[str, str] = {
        "email": "aaa@aaa.com",
        "password": "aaa@aaa.com",
        "role": "user"
    }

    # When
    response: Response = client.post(API_AUTHENTICATION_PREFIX+"/login", json=user_data)
    response_json = response.json()

    # Then
    assert response.status_code == status.HTTP_200_OK
    assert "access_token" in response_json
    assert response.headers["Token-Type"] == "Bearer"

def test_given_proper_user_when_registering_the_user_then_created_request_is_returned(
    inmemory_database_creation_function: Callable[[], Database[Any]],
) -> None:
    # Mock DB
    app.dependency_overrides[Connector.get_db] = inmemory_database_creation_function

    # Given
    user_data: dict[str, str] = {
        "email": "test@test.com",
        "password": "password123",
        "role":"user"
    }
    # When
    response: Response = client.post(API_AUTHENTICATION_PREFIX+"/register", json=user_data)

    # Then
    assert response.status_code == status.HTTP_201_CREATED
    assert response.json() == {"email": "test@test.com", "role":"user"}
The added tests are end-to-end (E2E) tests, where we test the functionality from sending a request to getting a response through all layers of abstraction, including the database (initialized in memory). The first test checks the correctness of login when the user logs in with data available in the database (i.e., correct credentials), and the second checks the correctness of registration. Both scenarios represent the so-called ‘happy path’, meaning the correct client request.
At this stage, you can already run the tests using the command python -m pytest. You may also need to install the pytest library from your local environment (non-containerized). In that case, use the command pip install pytest.
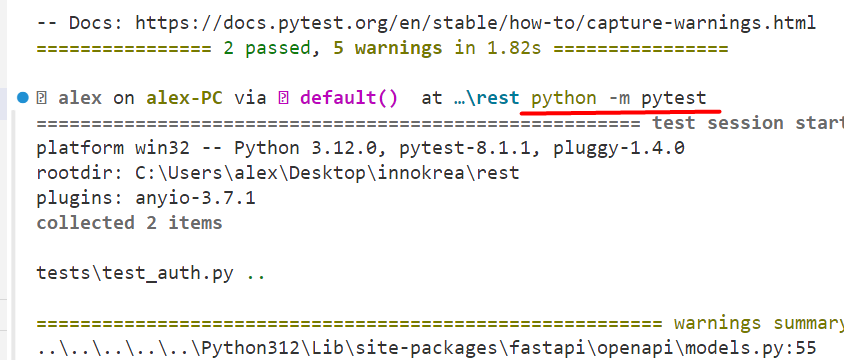
Figure 1 – Running tests locally
Using Docker to run the tested software
Now, to run the tested code in Docker, we will use the so-called 2-stage-build and two versions of requirements files – one with libraries for testing and the other for deployment – without unnecessary libraries. To do this, we will create Dockerfile.prod, docker-compose-prod.yml, and requirements.prod files, all of which we will create in the main folder.
Dockerfil.prod:
FROM python:3.11-slim as tester
WORKDIR /app
COPY requirements.dev .
RUN apt-get update && \
apt-get install -y python3-pip && \
 pip3 install pytest && \
 pip3 install --no-cache-dir -r requirements.dev
WORKDIR /app
COPY . .
RUN [ "python", "-m", "pytest", "--junit-xml", "/app/test.xml"]

FROM python:3.11-slim
ENV PYTHONDONTWRITEBYTECODE 1
ENV PYTHONUNBUFFERED 1
WORKDIR /app
COPY requirements.prod .
RUN apt-get update && \
 apt-get install -y python3-pip && \
 pip3 install pytest && \
 pip3 install --no-cache-dir -r requirements.prod
COPY --from=tester /app/test.xml .
COPY ./app /app/app
WORKDIR /app
EXPOSE 8000
CMD ["uvicorn", "app.app:app", "--host", "0.0.0.0", "--port", "8000","--reload"]
Here we see a 2-stage-build, where in the first part we have testing using pytest, and in the second part, we install a limited version of requirements and copy the test result in XML format into the container.
docker-compose-prod.yml:
version: "3.9"
services:
  rest-service:
    build:
      context: .
      # Prod version of Dockerfile
      dockerfile: Dockerfile.prod
    container_name: rest-service
    restart: always
    environment:
      - WATCHFILES_FORCE_POLLING=true
      - DB_HOSTNAME=db
      - DB_USERNAME=root
      - DB_PASSWORD=root
      - DB_PORT=27017
      - DB_NAME=db

      # JWT CONF
      - JWT_TOKEN_ALG=HS256
      - JWT_ACCESS_TOKEN_SECRET_KEY=accesssecret
      - JWT_ACCESS_TOKEN_EXPIRE_MINUTES=10080

    ports:
      - "8000:8000"
    networks:
      - network

  db:
    image: bitnami/mongodb:7.0.7-debian-12-r0
    container_name: db
    restart: always
    environment:
      - MONGODB_REPLICA_SET_MODE=primary
      - MONGODB_REPLICA_SET_KEY=123456
      - ALLOW_EMPTY_PASSWORD=yes
      - MONGODB_ROOT_USER=root
      - MONGODB_ROOT_PASSWORD=root
    healthcheck:
      test: echo 'db.runCommand("ping").ok' | mongosh localhost:27017/db --quiet
      interval: 10s
      timeout: 10s
      retries: 3
      start_period: 20s
    volumes:
      - ./db-init.js:/docker-entrypoint-initdb.d/initialize.js
    networks:
      - network
networks:
  network:
The compose file in the prod version does not have a bind mount, and the entire code is copied using Dockerfile.prod. We have also removed the admin panel because it is not needed in this version.
requirements.prod:
annotated-types==0.6.0
pydantic==2.4.2
uvicorn==0.23.2
fastapi==0.103.1
pymongo==4.6.2
pyjwt==2.8.0
passlib==1.7.4
httpx==0.27.0
aiokafka==0.8.0
asyncio==3.4.3
We can see that there are fewer libraries in the file because we remove those related to testing.
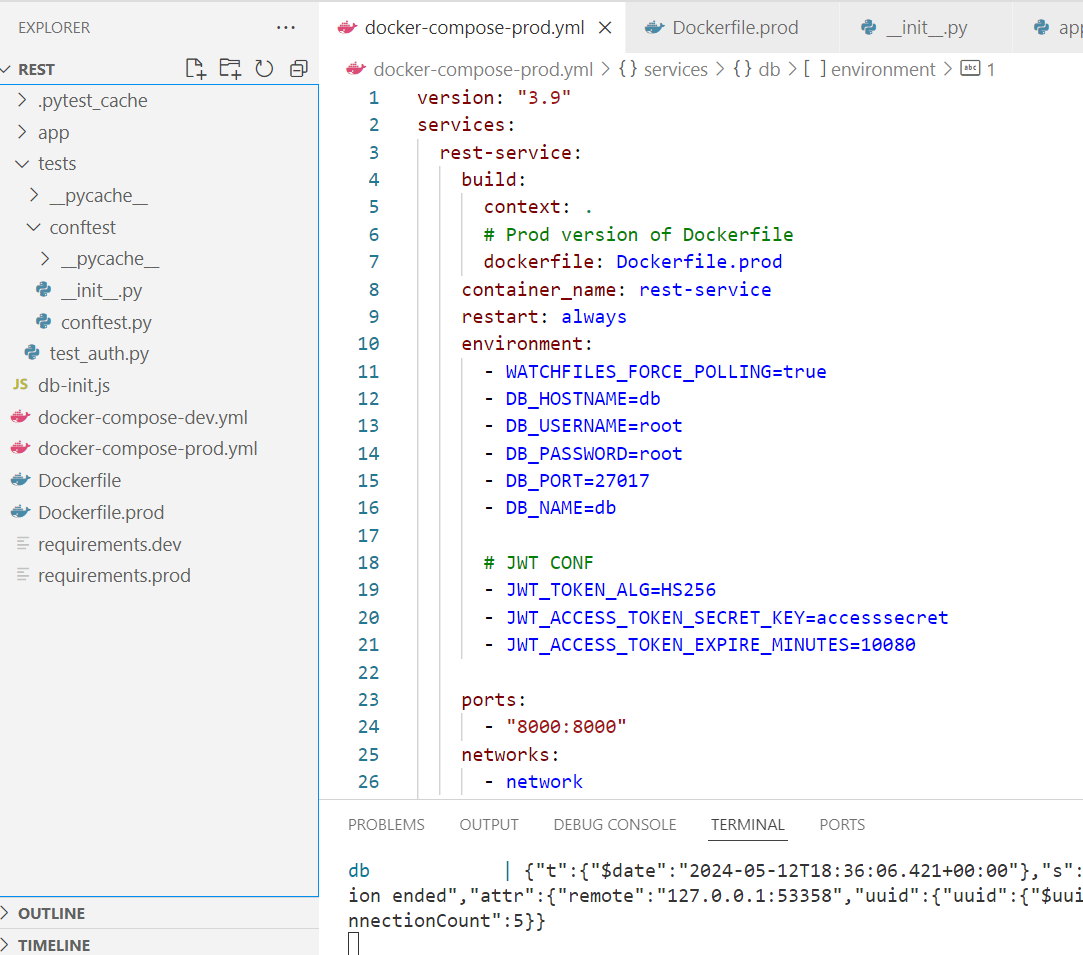
Figure 2 – Final project structure
Execution
To run the prod version with tests in a container, we can execute the command:
docker-compose -f docker-compose-prod.yml up --build
After running, if everything went according to plan, we should obtain an XML file with the test results, which we can retrieve to our computer using the command:
docker cp rest-service:/app/test.xml
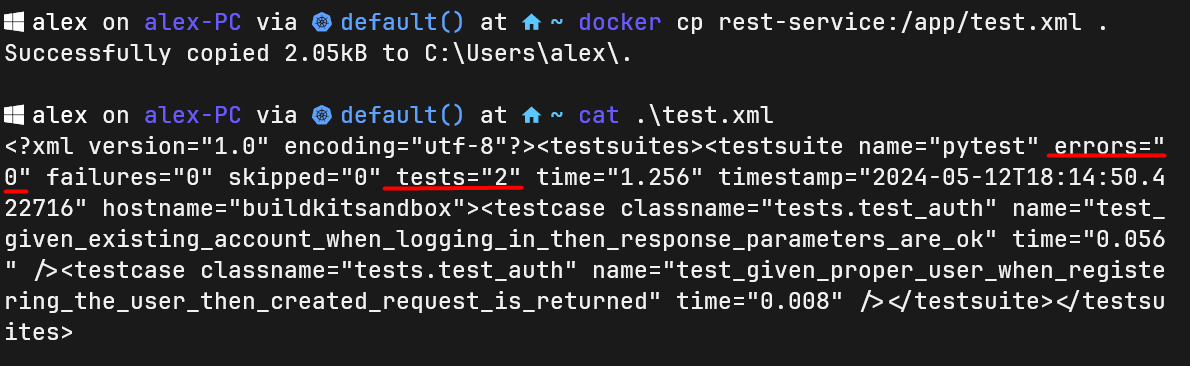
Figure 3 – Retrieving the test file from the container and obtaining the test results fil
Summary
That’s all we’ve prepared for you in this series. We hope that with our article, you will be able to create a well-organized project in FastAPI and correctly configure tests for it. We also encourage you to check out our articles on Docker. Until next time!