Green Data Centers – How to Choose an Eco-Friendly IT Partner?
A Guide for Companies Looking for IT Providers Using Energy-Efficient Infrastructure and Renewable Energy
 Author:
Today, as Innokrea, we invite you to another episode of the series presenting the approach of Infrastructure as Code (IaC) using the Terraform tool. If you are interested in understanding how IaC can be applied in a GitHub repository or what issues you may encounter in managing the Terraform state, we encourage you to read on.
Terraform versus GitHub
The IaC approach is used in many services, including the creation of repositories. If we want to establish a standard for managing repositories within our company, in the form of code that is easily manageable and shared across all products delivered by our company, Terraform comes to our aid. We have the ability to set the appropriate parameters for resources such as:
To create such a repository using Terraform, you first need to create a token for the GitHub API with the appropriate permissions for your account, and then define the provider and resource accordingly. If everything is correct, executing the apply command will apply the changes, and the remote repository will be created.

Figure 1 – Creating a GitHub repository using Terraform code.
State management
In the last article, we mentioned the terraform destroy command, which allows for the destruction of remotely created resources (e.g servers) previously deployed using terraform apply. It’s worth noting that if we remove a few lines related to a resource from our Terraform file, Terraform will also attempt to delete that object through the remote API when we execute the terraform apply command. Therefore, Terraform aims to maintain consistency between the local state of the infrastructure and the remote state, and the apply command helps achieve that. By using .tfstate files, Terraform stores information about the state of each object, which is updated when changes occur. If we execute the terraform destroy command, the state files will disappear.

Figure 2 – Contents of the .tfstate file.
It’s important to note that the .tfstate file stores more information than the .tf file because it holds the complete state of the object, including values that we did not define. It is generally not recommended to manually edit this file. However, deleting the .tfstate file manually can lead to inconsistencies between what is displayed in the console and the actual state of the infrastructure, such as creating additional repositories or servers.

Figure 3 – Additional default parameters not provided by users.
However, if the remote state is modified, for example, through manual server editing, you can observe the change locally by executing the terraform plan or terraform apply command. After executing the apply command, the remote state will be overwritten with the local state defined in the file. An example is presented below.

Figure 4 – Manual change of instance type from the AWS panel.

Figure 5 – Response to a manual change. Terraform has detected the difference and suggests restoring the infrastructure to a state consistent with the local one.
Arguments vs. Attributes
Terraform introduces distinctions between parameters by categorizing them as arguments and attributes. Arguments are used to define inputs for a resource. They are typically used within the resource block to specify values required for creating or modifying a resource.
On the other hand, attributes are used to retrieve results from a resource. They are usually used outside of the resource block to obtain information about a created resource. For example, after creating an EC2 instance, you may want to retrieve its public IP address, DNS name, or instance ID.

Figure 6 – Example attributes from the documentation of a certain plugin.
There are attributes that we have no control over, and their values can only be obtained after initializing the infrastructure, such as an IP address assigned by the provider. To display a specific attribute or argument, we use the output block. The available attributes can be read from the documentation or the .tfstate file. The syntax for the output block is as follows:
output <custom_name> {
value = <object_type>.<local_name>.<attribute_name>
}


Figure 7 and 8 – Displaying attributes related to the created GitHub repository and AWS EC2.
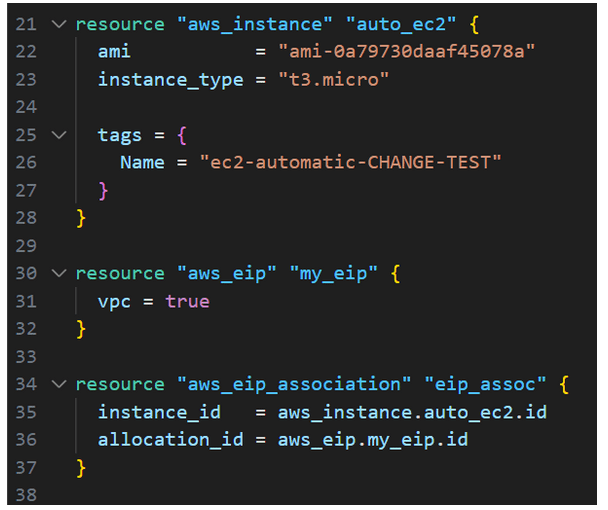
Sometimes there are dependencies between resources, such as the IP address of one object needing to be specified as input for another object. In the image below, the ElasticIP and EC2 object IDs are assigned to each other using the aws_eip_association resource.

Figure 9 – Assigning the appropriate IP to the instance using a new resource. Sometimes attribute assignment is done through intermediate resources like “association,” and other times it’s done directly. This depends on the implementation of the specific provider, and you should look for this information in the documentation.
Summary
Today, we have covered the basics of state management in Terraform and configuring a GitHub repository. However, proficient use of this tool requires practice and understanding of various aspects!

Green Data Centers – How to Choose an Eco-Friendly IT Partner?
A Guide for Companies Looking for IT Providers Using Energy-Efficient Infrastructure and Renewable Energy
Green IT

Helm for the Second Time – Versioning and Rollbacks for Your Application
We describe how to perform an update and rollback in Helm, how to flexibly overwrite values, and discover what templates are and how they work.
AdministrationInnovation

Helm – How to Simplify Kubernetes Management?
It's worth knowing! What is Helm, how to use it, and how does it make using a Kubernetes cluster easier?
AdministrationInnovation